|
Paphiopedilum, Phragmipedium,
Cypripedium, and Mexipedium
Text and Photos by Marianna Max
Even for people who have gained experience
pollinating other orchid genera, Paphiopedilum and
Phragmipedium pollination can be quite mystifying at
first glance. For those used to seeing a small sticky stigma
that seems to "grab" the pollen, the broad smooth stigma
found in Paphiopedilum and Phragmipedium can
seem quite foreign. Pollination of the subfamily
Cypripedioideae (Paphiopedilum, Phragmipedium,
Cypripedium, Mexipedium) is in fact quite easily
accomplished once all of the "parts" are recognized. For
that reason we will start with an anatomy lesson and
dissection of a typical Paphiopedilum flower.
Figure 1 shows the front view of an intact
Paphiopedilum. In this first view none of the sexual
parts of the plant are visible. The stigma (the female part
of the plant which is the gateway to the ovary) is hidden
within the pouch at the back of the column (the central
extension of the stem and ovary that gives rise to the
anthers, stigma and staminode). The anthers (there are two
separate anthers in cypripedioids, unlike other genera which
only have one anther) are hidden behind the ears of the
staminode. The staminode is an interesting structure which
no doubt helps to attract the pollinator to the flower and
which provides part of the mechanical barrier that directs
the pollinator in the right direction to pick up and deposit
the pollen on the stigma.
|

Figure 1: Front view of
Paphiopedilum
|
In Figure 2 we see a side image of an
intact flower. For the first time we can begin to see the
sexual parts of the flower. Behind the staminode we can just
see a bit of the anther. The majority of the stigma is
hidden behind the side lobe of the lip. We can just see the
back of the stigma where it attaches to the column.
|
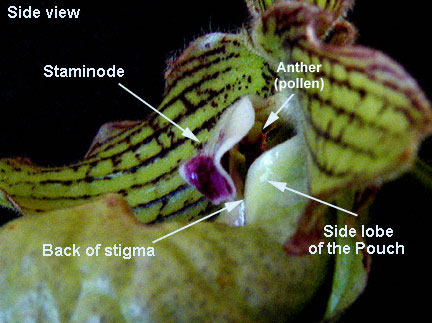
Figure 2: Side view of
Paphiopedilum
|
In Figure 3 we have removed the pouch
where it connects to the column and view the flower from the
bottom. For the first time we can clearly see the stigma, a
broad, smooth, flattened fingertip-like structure. While it
is possible to pollinate a Paphiopedilum or
Phragmipedium without removing the pouch, it is
considerably easier to see what you are doing if the pouch
is removed. Generally an easy way to remove the pouch is to
rock it to one side until you hear a crack and then to the
other side. This should partially detach the pouch at each
side and the rest of the removal can easily be accomplished
with a bit of twisting and pulling. Be sure and support the
rest of the flower with your other hand so as not to damage
it during this process. Alternately, the pouch can be
removed by cutting with small scissors but if you choose
this route be sure and sterilize them so as not to risk
transmission of virus. There is no need to remove the
synsepal since it can generally be bent back out of the way
of the stigma (In Cypripedioideae the synsepal is formed by
fusion of the two lateral sepals and it forms a sort of
apron behind the pouch).
|

Figure 3:
Paphiopedilum with pouch
removed
|
|

Figure 4:
Paphiopedilum column
|
Once the pouch is removed the hard work is
really done. We will look at a few more views of the flower
just to provide a thorough orientation, but at this point we
have access to all of the structures we need to complete
pollination. In Figure 4 we move in closer so as to
see the anther and the pollen on one side of the column
(remember that there is a second anther on the other side).
You can also see the relationship of the anthers to the
stigma and column in Figure 5. In this view we have
turned the flower upside down and are looking at it from the
front. The stigma can clearly be seen and the two anthers
can barely be seen on either side of the column behind the
stigma. The anther holds the pollen, which is attached via a
small horn or "hanger" off the column. In paphiopedilums,
the pollen is held in a waxy fairly undefined mass with the
consistency of mealy beeswax. It is difficult to distinguish
the anther cap (i.e. a cup-like structure that is well
developed in other genera that holds the pollen) in
paphiopedilums. At most, the anther cap in paphiopedilums
appears to be a slightly more consolidated waxy surface that
lies on the outermost region of the pollen mass. This
modification can best be seen in the fourth image as the
darker area of the pollen mass. While in most genera, the
pollen can easily be separated from the anther cap, this is
often difficult to accomplish in paphiopedilums.
|
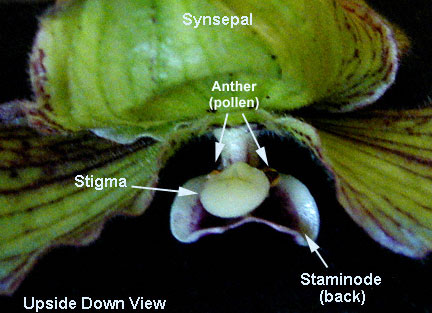
Figure 5:
Paphiopedilum with pouch removed, looking
up
|
In Figure 6 we can see where the pollen
mass has been removed from one of the anthers and an attempt
has been made to separate the inner pollen mass from the
anther cap. The pollen mass can be removed by grasping it
with forceps or by sticking it to a toothpick. Since the
pollen mass is not particularly sticky, it may be necessary
to lick the toothpick or even to use the sharp end of the
toothpick to impale the pollen mass should you choose to use
a toothpick (for pollination). It probably is not necessary
to remove the inner pollen mass from the anther cap to
achieve pollination since both are soft and waxy and can
easily be smeared onto the stigma.
|
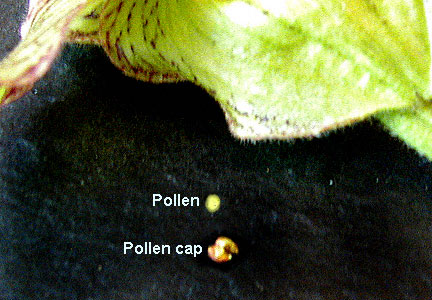
Figure 6:
Paphiopedilum pollen
|
In Figure 7 we can see where the inner
pollen mass has been applied to the stigma. This can be
accomplished by "sticking" the pollen mass to the stigma
using a bit of the saliva left on your toothpick or by
simply by pressing it up against the stigma surface using
gentle pressure from the toothpick. If the inner pollen mass
is not removed from the anther cap before applying to the
stigma surface, try to position the anther cap/pollen mass
so that the inner pollen mass surface is against the stigma.
The pollen masses from both sides should be used to maximize
the amount of seed obtained unless one of the pollen masses
is needed for other pollinations. The final step in
pollination is to the smear the pollen mass over the surface
of the stigma. This can best be accomplished with the flat
end of the toothpick. Gently push the pollen mass flat and
spread it over the surface of the stigma much like you would
butter a slice of bread. Be gentle so as not to gouge the
stigma or inadvertently break it off.
|

Figure 7: Pollen applied
to Stigma
|
|
Cross pollination is always preferable for
reasons of genetic diversity, but paphiopedilums
and phragmipediums can often be self pollinated
successfully if a suitable outcross is not
possible. The visible response to pollination in
paphiopedilums is minimal and often it is difficult
to tell if the pollination has taken until the
ovary begins to swell. Unlike many other genera,
the flower does not show any initial wilting in
response to pollination but abruptly falls off the
ovary leaving a clean scar at the ovary tip. The
ovary does not swell right away but if the stem
doesn't turn brown and desiccate it is likely that
your pollination has been successful.
The final image, Figure 8, shows a view
of the ovary several months following pollination.
Note the lack of the wilted flower at the apex of
the ovary, which is otherwise typically present in
orchids outside of this subfamily.
|
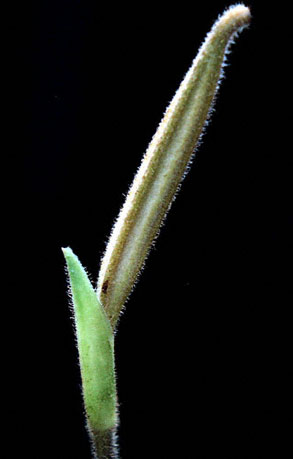
Figure 8: Developing
capsule of Paphiopedilum fowliei
Photo by Dale Borders
|
|