The pollination method
discussed here was described to me by Dr.
Gernot Bergold of Venezuela, an orchid expert
for whom two species of Coryanthes
have been named.
This article deals specifically with the
mechanical details involved in pollinating
Coryanthes, which have a bizarre
flower structure, but the principles are the
same for other orchids. All orchids have a
column, ovary, pollinia, and stigma--those
reproductive structures are what make a
flower an orchid.
-Troy
|
Pollination of Orchids in the Genus
Coryanthes
Text by Troy Meyers, Photos by Dan and Marla
Nikirk
Coryanthes
Flower Structure
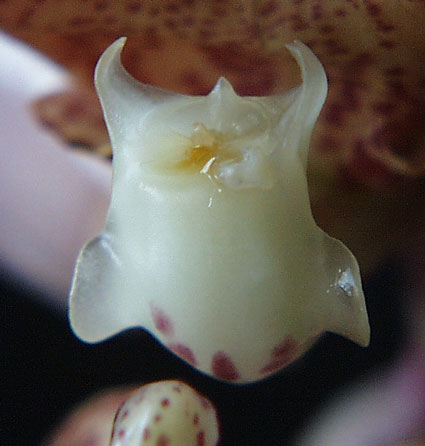
The flower of the Coryanthes has the usual
parts of the orchid flower, but they are unusually shaped
and highly specialized. Please refer to the three
photographs below for a better understanding.
The ovary is the stem-like connection between the
flower and the flower spike.
The sepals, which initially serve as the outer layer
of the unopened flower bud, are thin and membrane-like. The
lateral sepals resemble "wings" when the flower is freshly
opened and fully extended, but with a little age they may
curl or roll up. The dorsal sepal forms a "cape" draped over
and toward the end of the column.
The column itself isn't too oddly formed, but it fits
tightly into the complex lip almost as if it were connected
along its whole length, which it is not. The column carries
both the male anther and the female stigma, and is the focus
of the pollination attempt.
The relatively small lateral petals have the same
thin substance as the sepals. They are arranged more or less
parallel to the column and sometimes drape over the sides of
the column.
The third petal, which has evolved into the lip or
labellum in orchids, is especially complex in the genus
Coryanthes. The lip is attached near the apex of the ovary
by a slender connecting structure called a "claw." Beyond
the claw, the lip is divided into three primary structures
called the hypochile, mesochile, and epichile.
The hypochile is usually cap-like and usually the
scent of the flower comes from osmophores underneath the
cap.
The mesochile descends from under the cap toward the
bucket-like epichile. The mesochile sometimes has shelf-like
or scale-like structures protruding from it, known as
lamellae. The pictured Coryanthes mastersiana does
not have lamellae.
The epichile is the last segment of the lip, and it
is bucket-shaped and fits tightly against the column at its
terminus.
A pair of water glands known as pleurids are located
usually on the column near where the claw connects to the
ovary. These drip water into the bucket of the epichile.
|

Profile of Flower with
Major Parts Indicated
|
|

Dorsal View of Flower
with Major Parts Indicated
|
|

Dissected Flower with
Major Parts Indicated
|
Coryanthes
Pollination in Nature
In the native habitat, most Coryanthes
are pollinated by euglossine bees of the genus
Eulaema or Euglossa. The male bees (sometimes
of only one species) are attracted to the flower by their
fragrance, which is emitted by osmophores under the cap of
the hypochile. They attempt to collect this fragrance (an
aid to attracting mates) but the waxy mesochile is difficult
to get a firm foothold on, so a bee might slip and fall into
the bucket-shaped, waterfilled epichile. The bee's wings get
wet when it drops into the fluid filled bucket, which makes
flying out of the bucket impossible, and because the walls
of the bucket are too slippery, climbing up the steep bucket
walls is not an option.
The only possible exit is for the bee to crawl up the escape
ramp and out the small space between the end of the epichile
and the tip of the column. This escape route is visible on
the preceding photograph of the dissected flower. The
following photo shows that the space allowed for the bee to
escape is a very tight fit, since the right bee for the job
is one that barely fits through the hole. The bee can be
caught in the outlet for quite awhile before it finally
works its way through. The bee's struggle to free itself
loosens the anther cap which frees the pollen so it can be
stuck to the back of the bee.
The bee is so attracted to the odor that it never learns its
lesson, so it continues to search for the source of the
fragrance on the same flower or another blossom. Again it
falls into the liquid filled bucket of the Coryanthes
lip, but this time, as it struggles to leave through the
tiny opening, its back is forced against the column and the
pollen is deposited into the sticky stigma thereby
fertilizing the flower. The stigma of the flower usually
does not open or produce sticky fluid until after the anther
cap is removed, a sequence which discourages
self-pollination.
|

Escape Route between
Column and Epichile
|
Coryanthes
Pollination Technique for Humans
The method described to me by Gernot Bergold
retains some of the features of the chain of events that
occur with natural pollination.
On the day the flower opens, or the next day, remove the
pollinia as follows. This is done by removing the
anther cap and then grasping the stipe ("stem") of the
pollinarium with forceps, or by simulating the passage of a
bee with a toothpick or something similar, to which the
pollinarium may adhere. Sometimes the anther cap may come
off with the pollinia embedded in it, and you should tease
the pollinia out.
Store the pollen at room temperature, and not in a sealed
container unless it is large. This will allow it to dry
somewhat, making it firmer and easier to manipulate the next
day.
|

End of Column with Anther
Cap Removed
Note that sometimes with human pollination, the
pollinia will come off in the anther
cap.
|
|

Removal of Pollinarium
with a Toothpick
|
On the day following removal of the
pollen, it should be inserted into the stigmatic cavity.
Assuming that everything goes well, removing the pollen and
anther cap the day before should have caused the stigmatic
slit to open.
If the stigmatic slit isn't open, you can wait another day,
but this is risky because the flower may simply become too
old to be pollinated successfully. Consider dissecting a
slit into the column where it should be (best), or
progressively slicing the end of the column off until the
chamber is just revealed. If this is necessary, use a very
sharp, sterile razor blade or scalpel. (See the notes below
about the bucket being in the way for all this.)
In the case of the flower being pollinated for this series
of photographs, the stigmatic slit appeared to be open
enough to accept the pollen even on the day the pollen was
removed, but by waiting a day, the flower has time to
produce the hormones needed to encourage growth of the
pollen tubes.
|

End of Column, as view
from below, showing location of Stigmatic Slit
The Epichile is being held away from the Column
to allow access to the Slit for
pollination.
|
|
The pollination should be attempted
around noon (within a couple of hours), and in sun
if possible. Dip the pollinia in the bucket-water
of the epichile. Accessing the stigmatic slit is
difficult because it is on the underside of the
column and against the end of the epichile. Have a
helper hold the epichile bucket to one side, or
away from the column so that you can access the
stigmatic slit.
If you don't have a helper, and can't manage to
hold the bucket aside and handle the pollen at the
same time, you can remove the entire labellum by
cutting through the claw with a sterile blade.
Work the pollen into the stigmatic slit,
trying to get it to move in and toward the
direction of the ovary. Try to put both pollinia
all the way into the slit. In the photograph below
you can see the the viscidium (sticky foot) and
stipe (pollen stem) hanging out a bit... that is
fine.
|

Somewhat dried Pollinia,
Dipped
|
|
End of Column after
insertion of Dipped Pollen
|
Expect a thick stigmatic fluid to fill
the stigmatic chamber in response to the pollination in the
next few days. This might tend to push the pollinia out...
if some remains inside the chamber, don't disturb anything,
but if all comes out, try to work it back in. Usually the
slit will swell shut, sealing in the pollen, which will
germinate and grow upward inside the tube of the column and
ovary, fertilizing the ovules. These tubes can be seen in
the dissection photo above.
|

Swelling Column and
closed Stigmatic Slit
|
The flower sepals, petals, and labellum
will wilt in the next few days, but if the pollination
was successful, the column and ovary will remain
healthy looking and will stay attached to the stem of the
inflorescence. The ovary will swell.
|
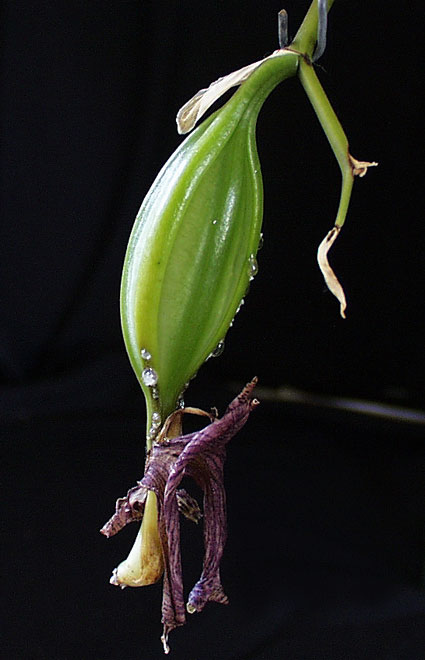
Developing seed capsule
at 45 days after pollination
|
The typical amount of time from
pollination to having a ripe capsule (ovary) is 65 days,
varying a bit with different species and cultural
conditions. The ovary will get surprisingly large, and when
ripe will begin splitting where the capsule joins the
column. Harvest the capsule as soon as the smallest split
occurs.
|

Capsule Splitting at 59
days
|
|