|
A Close Look at a
Brassolaeliocattleya
Text by Marianna Max and Photos by Dale
Borders
|

Figure 1:
Brassolaeliocattleya Drumbeat 'Heritage', a
showy hybrid
|
Pollinating an orchid is really quite simple
once you know the basic flower parts and where to find them.
Even relatively small-flowered orchids can be pollinated
using the following method although for this illustration we
will use a large specimen for clarity. The first
figure shows Brassolaeliocattleya Drumbeat
'Heritage' in full bloom. These large blooms make an
irresistible target for a pollinator (even though this is a
hybrid!). Large showy petals and sepals that flutter in the
breeze attract the pollinator's attention, in this case
possibly a bee. Flowers also have unseen (at least to us)
ways to guide pollinators to the target. For example,
flowers may have the equivalent of "landing lights" or
"runway guides" that are visible in the ultraviolet
spectrum. Bees, which can see in the ultraviolet, will see
very bright targets almost like a bulls-eye, but which to us
appear as simple striations. A flower like this may appear
very different to a bee than to us. As can be seen in
Figure 2, the striations in middle of the flower
point from the lip towards the center of the flower and the
column which houses the sexual parts of the flower. Let's
take a lesson from the bee and move in closer to take a look
at the structure of the column. A close front view of the
column can be seen in Figure 3.
|

Figure 2:
Labellum
|
|

Figure 3: Column as
viewed from the outside of the
flower
|
The column is the central structure that is
contiguous with the stem (pedicel) and the ovary. The petals
(usually held at 2, 6 and 10 o'clock with the petal at 6
o'clock being modified into a lip or in the case of
Cypripedium into a pouch) and the sepals (at 12, 4 and 8
o'clock) attach to the base of the column where it joins
with the ovary. The column contains the stigma, which is the
"female" sexual part of the flower and the anther, which is
the "male" sexual part of the flower. In most orchids the
anther is held at the front top part of the column. The
anther is made up of the anther cap, which protects the
pollen and sometimes positions a viscidium (sticky pad
attached to the pollinia via a thread or stipe) that helps
the pollen stick to the pollinator, the multiple locules
which hold the pollinia, and the pollinia, which consist of
pollen grains that are molded into hard and waxy or mealy,
solid, compact structures. Most orchids have two, four or
eight pollen masses or pollinia. No orchids have loose
pollen grains. Pollinators usually encounter the pollinia
when exploring the flower and these pollinia "glue"
themselves to the part of the pollinator which comes into
contact with them - either by being themselves sticky or via
a sticky viscidium, which attaches to the pollinia via the
stipe. The rostellum is a veil-like structure that bisects
the column on a horizontal plane and is positioned between
the pollinia in their anther housing and the sticky surface
of the stigma. This can best be seen in Figure 4.
|

Figure 4: Underside of
the Column
|
The goal of this exercise is to get the
pollinia out of the anther and onto the sticky part of the
stigma without losing it on the floor! I like to place the
plant on a white piece of paper so that if I drop the anther
or pollinia, I will have a better chance of finding it. Using
the flat part of a toothpick, touch the end to the sticky
fluid on the stigma. You might want to remove the lip of the
flower the first time you do this so you can see what you
are doing, but generally this maneuver can be accomplished
"blind" by simply putting the end of the toothpick in the
vicinity of the stigma and briefly touching it. This will
make your toothpick sticky and make it easier to remove the
pollinia from the anther. Now, simply touch the toothpick to
the base of the anther cap and gently lift. This will expose
the pollinia and you can touch the pollinia with the sticky
part of the toothpick. Generally the pollinia will pull out
of the anther cap and either the cap will remain on the
column or it will fall away. Sometimes the whole assembly
will come away together. If that happens it is best to put
the anther in the dampened palm of your hand, and with the
toothpick in the other hand (hopefully still sticky), gently
touch the area where the pollen is located and pull up. This
should dislodge the pollinia from the anther cap.
Masdevallias are often difficult to pollinate because of
their small size and the fact that the pollinia tends to
stay in, and is difficult to remove, from the anther cap.
For these you may need a magnifying glass and forceps.
|
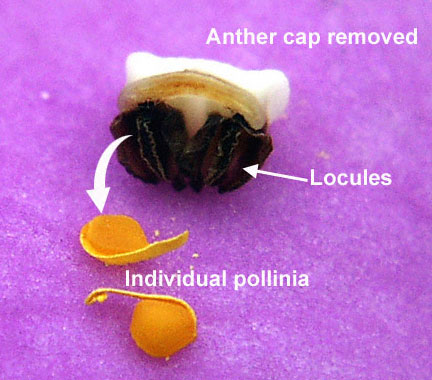
Figure 5: Anther cap and
Pollinia
|
Figure 5 shows a view of the anther
resting on a sepal of the flower. The pollinia have been
removed and are lying next to the anther. You can see the
locules (the sack like structures) that hold the pollinia.
Now it is a simple matter to pick up the pollinia with the
sticky stuff that is still on the tip of your toothpick. You
can simply make the same motion as you did previously when
you got the tip of the toothpick sticky. This time you will
carry the pollinia to the stigma. The pollinia should easily
stick onto the stigma surface. Figure 6 shows the
view that you will see as you bring the toothpick in towards
the stigma. Notice that the anther cap is gone and the
rostellum (the front edge of the stigma) is visible. If you
have removed the lip, you may want to view the flower from
the bottom. If you haven't removed the lip, it may be
necessary to gently push the lip down to get it out of the
way when you move the toothpick into position. Figure
7 shows the pollinia applied to the stigma. This is the
job completed! Now the rest is up to the flower.
|
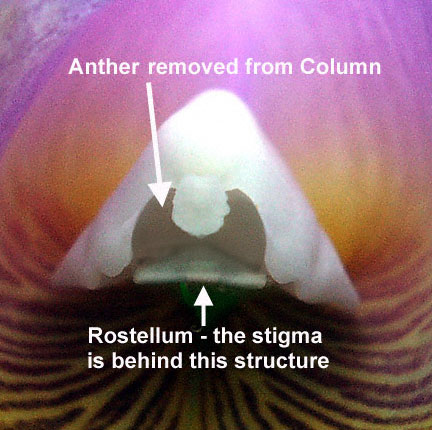
Figure 6: Column end
after pollen removal
|
|

Figure 7: Underside of
Column after Pollination
|
What happens in the event of a "good"
pollination, i.e. one that is compatible with the plant, is
that usually the stigma swells and sometimes encases the
pollen. This response, which I call the pollination
response, indicates that the flower is aware of the
pollinia. This is a good sign but doesn't necessarily mean
that the pollination will be successful. Sometimes flowers
have mechanisms to avoid being self-pollinated and will not
complete the process if pollen from the same plant is placed
on the stigma. Often the flower will also wilt and some
flowers even change color upon pollination. Over the course
of the next few days, if the flower is responding
appropriately to the pollen, pollen tubes will form in the
stigma and grow into the ovary. These pollen tubes make a
passageway for the pollen grains to find the ovum and unite
the genome of the pollen with that of the ovum. In a "good"
pollination, the ovary will begin to swell, usually in a
matter of days. This varies amongst species but if you see
the ovary swelling, you are probably on your way to growing
a capsule. Even this doesn't guarantee success however, as
some flowers will grow a capsule and there won't be any live
embryos in the seed. This is the reason that Troy does a
microscopic exam of the seed that you donate. By performing
this operation he can estimate how many seeds have live
embryos and can estimate how many seeds to sow for the
mother flask. He can also avoid sowing seed with no live
embryos and this helps to make flasking cost effective.
Check out some of the seed reports here for a view of
embryos.
Bad Vanda
coerulea seeds Good
Vanda
coerulea seeds
Bad
Encyclia wendlandiana
seeds Good Encyclia
brachiata seeds
You can find out more about harvesting your
seed by referring to Troy's article "Capsule
Drying and Seed Preparation". There are also other
articles on this site discussing some of the unusual
pollinations required by certain genera, please check the
Index of Informational
Pages.
|