Meyers Conservatory - troymeyers.com
Site Navigation
Flasking Home Page
Your Picks List
Comprehensive List
Articles in the Site
Search
Ready-To-Go Flasks
Fast-Turn Flasks
Greenhouse Plants
Current Reservations
Testimonials
 
If you would like to direct someone to this web page, please copy and paste this URL into your email:
http://troymeyers.com/about?Flaskling-Care


Caring for Seedlings Removed from Flasks and A Method of Compotting in Sphagnum


Text and Photos by Troy Meyers


There is no one best way to pot seedlings just removed from flasks. What will work for you depends on your growing conditions, watering habits, and of course the type of plant being potted.

That said, it is still worthwhile to describe the method we use to pot the majority of seedlings at Meyers Conservatory. For us, this provides the conditions that most seedlings appreciate right after being unflasked. While the compots (community pots) are placed in the varying cultural environments appropriate for the each kind of plant, the method of potting the plants is the same for most species. The method may work as well as it does because the way we prepare and use the medium results in a moisture balance similar to what the roots of the plants were used to in the gelled medium of the flask.

Pot Size
We use a uniform size of pot, 3.5 inch square. This makes watering a large number of pots easier because they all dry at a similar rate and can be watered with a similar amount without smaller or larger pots being over- or under-watered.

Number of Plants per Pot
We place a few, or many, plants in each pot, depending on the size of the plant. Large numbers of small plants will tend to use up moisture at a rate similar to a pot with a just a few large plants, again making moisture maintenance easier when dealing with large numbers of plants.

Sphagnum Preparation
The potting medium we use is dried Chilean sphagnum moss. We soak this under a "1/4 strength" solution of fertilizer water, squeezing it to get it thoroughly wet. Right before or during use we wring it out, leaving it just-moist, not wet. The sphagnum will carry all the fertilizer that the plants will need for the first few weeks after potting. A discussion of a method of putting the plants into the compots is given in "Our Compotting Method" below.

Watering
When the pots are watered, just enough pure water, not fertilizer, is added to restore the moss to the just-wrung-out moisture level. If you are using the pot size we recommend below, this is literally only a couple of tablespoons of water per pot unless it has gone bone-dry. The moss should never be watered so much that it becomes soggy. The water should be applied to the sphagnum and not the foliage, when possible. Because it is never watered so much that excess flow out the bottom, additional fertilizer is not needed until the plants have put on substantial growth.

Initial Humidity
In our humid growing situation we don't need to do anything about providing the just-unflasked seedlings with extra humidity, but you may need to in your situation. Extra humidity for a few days, gradually decreasing, can help the seedlings adjust to their new environment. Care must be taken to not overdo the humidity, though. Excessive humidity will promote rots and molds, and can very quickly kill the plants. Here, we have a stiff breeze from circulating fans to prevent high-humidity troubles. If you decide to tent the seedling pots to provide a shelter with extra humidity, do not completely close the tent. The seedlings need fresh air and enough ventilation to make sure the humidity doesn't go over 80%. The tent should gradually be opened more over just a very few days to allow the humidity to be 65-70%. As the seedlings toughen, they should be able to handle the normal humidity of your growing area, though generally 60% should be the minimum for extended periods of time.

Light
The seedlings won't be able to handle intense direct sun, even if the adults of the species can do so. Seedlings should be shaded a bit more than what is expected for adult plants. This does not mean that the seedlings should be placed in a dim location. These plants are now relying on light to produce the sugars needed for growth, and if placed in too dark of a location, they will languish and eventually fail. Most people are inclined to want to protect them from bright light a little too much, so I usually recommend that you select a location just a little brighter than what you think might be correct. They need light!

Later Fertilizing and Repotting
When the plants have put on substantial growth, the pots can be fertilized more. It shouldn't be too much longer before those plants should be separated and potted individually in a medium more similar to that used for the adult plants of the species. When repotting it's usually best to remove all of the sphagnum so that there isn't a mass of sphagnum on the roots that will retain too much moisture under the adult watering schedule.


Our Compotting Method
To make the plants easier to separate later, and to give each good contact with the sphagnum, we place each seedling individually while making the compot. While at first look this seems quite labor-intensive, the results are good, and with practice and some tools it actually can be quite quick, though not as quick as just plopping them all in a pot.

Tools
The potting jig we use is made out of a couple of pots of the same kind that we pot into. Figure 1 shows a pot and the two parts of the jig which were made out of pots. The part on the left is the inner part of the jig, and it is a pot with one side and the bottom cut out of it. It also has a duct-tape tab affixed on the edge which is used as a handle in the process. The jig part on the right is a pot with only one side cut out. The bottom remains in this one, and it acts as the sturdy outer part of the jig.

Figure 1
Figure 1: Pot and Two-Part Jig

The Inner Jig
The inner part of the jig is used to transfer the "plug" of the plants and sphagnum into the destination pot. It must be able to be inserted into the pot with the plug, but then pulled back out, leaving the plug in the pot, without dragging any of the medium back out with it. This is why it doesn't have a bottom, but beyond that, it must be slit up the sides so that it can expand in the tapered pot, and any features that might hang up on the medium must also be removed, such as in this case, the angled areas where the drain holes used to be. Figure 2 shows the inside jig spread open just to reveal these features.

Figure 2
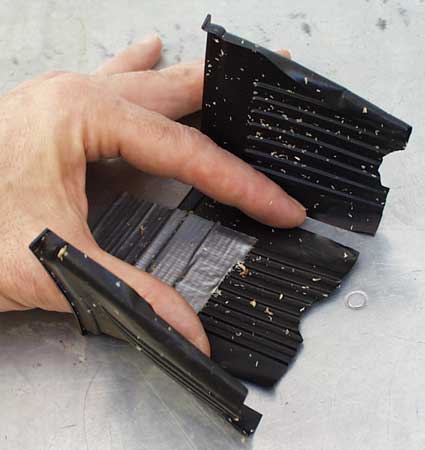
Figure 2: Cutting Detail of Inner Jig

The Assembled Jig
The two parts of the jig, put together and ready for use, are shown in Figure 3.

Figure 3
Figure 3: Two-Part Jig Ready for Use

Using the Jig: The First Layer
A layer of soaked, wrung-out sphagnum should be laid in the bottom of the jig, which is equivalent to the side of the pot. If you are going to plant many plants in the pot, then a thin layer should be placed, or thicker if fewer plants. This is shown in Figure 4.

Figure 4
Figure 4: First Layer of Sphagnum

First Row of Plants
Place a line of plants on top of the sphagnum layer, roots and base on the sphagnum, and the tops of the plants extending out of the open mouth of the jig. Put only a few plants if they are large, or more if small. This is shown in Figure 5.

Figure 5
Figure 5: First Row of Plants

Covering the Base of the Plants
The next step is to add another layer of sphagnum, but if some care is taken to cover the base of the row of plants with a few long strips of sphagnum, this makes for a very much neater and more uniform surface when the potting is completed. This is shown in Figure 6.

Figure 6
Figure 6: Covering Plant Bases with Long Strips of Sphagnum

The Next Layer of Sphagnum
In Figure 7 the rest of the layer of sphagnum has been added from the base of the plants to the back of the jig.

Figure 7
Figure 7: Finished Layer of Sphagnum

The Next Layer of Plants
In Figure 8 another layer of plants has been added.

Figure 8
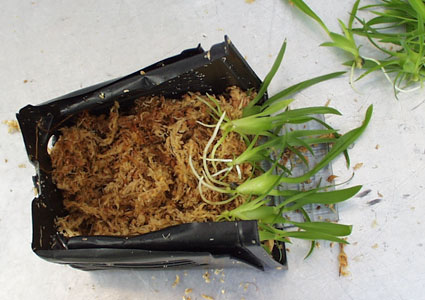
Figure 8: Second Layer of Plants

Keep Building Layers
Continue to repeat layers of sphagnum and plants until you run out of plants or pot space.

Figure 9
Figure 9: Final Layer of Plants

The Last Layer of Sphagnum
In Figure 10 the last of the layer of sphagnum has been added to fill the jig up to the top. Enough is added to make the plug fairly firmly packed, and it should spring back up out of the jig a little.

Figure 10
Figure 10: Final Layer of Sphagnum

Removal from Outer Part of Jig
The inner part of the jig is now removed from the outer part, which has been giving it mechanical support and providing a back wall (bottom of the pot) to build the layers against. See Figure 11.

Figure 11
Figure 11: Removal of Inner Jig

Insertion into Pot
Now the inner part of the jig is inserted, still tilted sideways, into the destination pot. See Figure 12.

Figure 12
Figure 12: Insertion of Inner Jig into Pot

Pot Upright
At this point the pot and plants are finally set upright. See Figure 13.

Figure 13
Figure 13: Pot Upright

Removal of Inner Jig
Using a couple of fingers on the surface of the sphagnum to keep the plug in place in the pot, withdraw the inner jig part from the pot by pulling upward on the tab handle. See Figure 14.

Figure 14
Figure 14: Removal of Inner Jig from Pot

Snugging and Labeling
With the inner jig part removed, the sphagnum and plants should be gently snugged down into the pot around the edges and perhaps between a few of the more central plants. Every pot should be labeled, and we recommend that at a minimum each tag should state the species of the plant, the TN Number, the Flask Number and the date potted. See Figure 15.

Figure 15
Figure 15: Completed Pot with Label


Go to Flasking Home Page -- Contact Us
Contents of all pages Copyright © 1999-2024. All rights reserved.